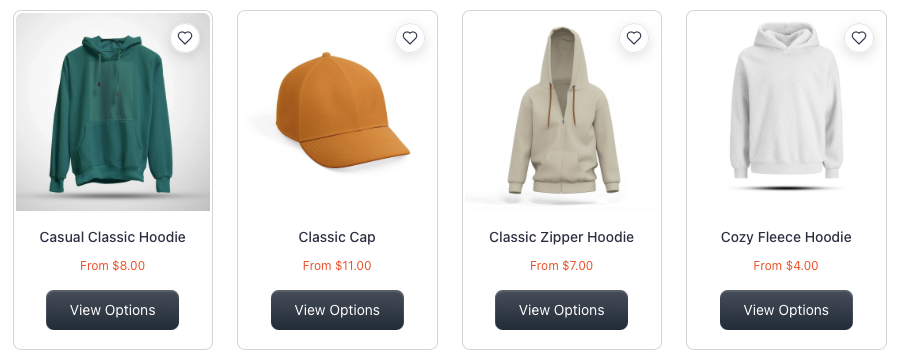
A wishlist gives shoppers a simple way to save products they are interested in without adding them to the cart immediately. It is especially useful for stores with product variations, larger catalogs, repeat customers, or products that require more consideration before purchase.
FluentCart does not need to be modified directly to add this workflow. With FluentCart Wishlist installed, wishlist controls can be added automatically to supported FluentCart product cards and single product pages. Bricks Builder users can also place dedicated wishlist elements exactly where they need them.
This guide explains how to install the wishlist add-on, display the button, configure its behavior, and verify that saved products remain synchronized throughout the store.
What You Will Need
Before starting, make sure the following are available:
– A WordPress website with FluentCart installed and active
– FluentCart products published on the storefront
– The FluentCart Wishlist plugin
– Bricks Builder only if your product templates are built with Bricks
No custom PHP or JavaScript is required for the standard setup.
Step 1: Install FluentCart Wishlist
1. Open WordPress Dashboard > Plugins > Add New Plugin.
2. Select Upload Plugin.
3. Upload the FluentCart Wishlist ZIP file.
4. Install and activate the plugin.
5. Confirm that FluentCart is active.
During activation, the plugin creates its required database tables and a published Wishlist page. The database migration is repeatable, so deactivating and reactivating the plugin will not duplicate its schema or existing wishlist records.
Step 2: Configure the Wishlist Settings
Open FluentCart > Wishlist in the WordPress dashboard. The General tab contains the main storefront settings.
You can configure:
– Whether logged-in customers may create custom lists on the frontend
– The default wishlist name
– The Add to wishlist label
– The Removed from wishlist message
– The Saved label
– The Wishlist label
– Guest wishlist cookie lifetime
– Data retention when the plugin is uninstalled
If customer list creation is disabled, products are saved directly to the customer’s default list. If it is enabled, logged-in customers can choose an existing list or create a new one from the Save to a list dialog. Guests continue to use their default wishlist.
Step 3: Add the Wishlist Button to Standard FluentCart Product Views
For standard FluentCart output, the plugin places the wishlist control automatically. You do not need to edit a template or insert a shortcode for the button itself.
The automatic integration supports:
– FluentCart product cards
– Shop and product archive listings
– Related-product cards
– Quick-view dialogs
– Single product buy sections
– Dynamically loaded products and AJAX pagination
On product cards, the default control appears as a circular heart badge near the top-right corner. On a single product page, the action appears with the buy controls. Clicking it saves or removes the product through AJAX, so the page does not reload.
The button state is synchronized across the storefront. For example, when a shopper saves a product on its single product page, matching cards on the shop page also display the saved state.
Step 4: Add the Wishlist Button in Bricks Builder
When a FluentCart product template is built with Bricks, use the native wishlist elements for predictable placement and styling.
Add a Button to a Product Loop
1. Edit the Bricks template that contains the FluentCart product loop.
2. Open the Bricks element panel.
3. Find the Wishlist category.
4. Drag Wishlist for Loop into the product loop item.
5. Choose a display type:
– Badge: a circular heart control intended for placement over the product card
– Button: an icon-and-text action that participates in the normal layout
6. Save the template and test it on the frontend.
When a supported Bricks single-product template is detected, the plugin avoids duplicating the automatic single-product button. The Bricks element becomes the manually positioned wishlist action.
Step 5: Display the Wishlist Page
20The plugin normally creates a Wishlist page during activation. Open Pages > All Pages and look for a page named Wishlist.
The page uses this shortcode:
[fluentcart_wishlist]
An alias is also available:
[fc_wishlist]
You can place either shortcode on another WordPress page if you prefer a custom page structure. Add the final Wishlist page to the site’s header, account navigation, or another appropriate menu so shoppers can return to their saved products.
The wishlist page displays product images, titles, selected variations, prices, and cart actions. When a variation image is available, it is used first; otherwise, the main product image is shown as a fallback.
Step 6: Add a Wishlist Counter
Bricks users can add the Wishlist Counter element to a header or global template. It displays a heart icon with a live item-count bubble and links to the plugin-created Wishlist page by default.
The element supports:
– A selectable icon
– A custom destination URL
– Icon and wrapper styling
– Counter typography, size, color, and position
– Hover styling
– An option to hide the bubble when the count is zero
The count updates automatically after products are saved, removed, or bulk removed.
How Guest and Customer Wishlists Work
Guests receive a secure random wishlist identity stored in an HTTP-only cookie. This allows their default wishlist to survive page refreshes and future visits from the same browser. The cookie lifetime can be changed in the General settings.
Logged-in shoppers have a persistent wishlist connected to their account. Their saved products remain available after logout and login. When a guest later signs in, eligible guest wishlist items are merged into the customer wishlist, with duplicate protection for the same product and variation.
Working with FluentCart Product Variations
The wishlist integration stores both the FluentCart product ID and the selected variation ID. On variable product pages, the wishlist action follows the active variation.
This means shoppers can save a specific size, color, or other variation rather than only the parent product. The saved variation name, price, and image can then be displayed on the Wishlist page and in the customer portal.
Always test at least two variations after building a custom single-product template. Confirm that changing the variation updates the wishlist action before clicking it.
Test the Complete Wishlist Flow
Before publishing the feature, perform these checks in a private browser window and as a logged-in customer:
1. Save a product from a FluentCart product card.
2. Confirm that the heart changes to its saved state without reloading.
3. Open the single product page and confirm that it is also marked as saved.
4. Remove the product and verify that all matching buttons update.
5. Save a specific product variation and check its name, price, and image on the Wishlist page.
6. Refresh the page as a guest and confirm that the saved item remains.
7. Log in and confirm that the guest item is merged into the customer wishlist.
8. Test product cards loaded through AJAX pagination or quick view.
Troubleshooting a Missing Wishlist Button
If the button is not visible, work through the following checks:
– Confirm that both FluentCart and FluentCart Wishlist are active.
– Make sure the current post is a published FluentCart product.
– Clear WordPress, page-builder, CDN, and browser caches.
– Regenerate Bricks CSS files if the template styles are stale.
– Use Wishlist for Loop inside a Bricks product loop instead of relying on automatic card placement.
– Use Wishlist for Single Product when the single-product template is built with Bricks.
– Check that the wishlist element is inside the correct FluentCart product context.
– Temporarily disable frontend optimization that delays or combines JavaScript, then test again.
For advanced variable products, ensure the FluentCart variation controls and add-to-cart section are present in the template. They provide the active variation context required by the wishlist element.
Frequently Asked Questions
a. Does adding a product to the wishlist reload the page?
No. Save and remove actions use AJAX, and matching wishlist controls are updated automatically.
b. Can visitors use the wishlist without creating an account?
Yes. Guests can save products to a persistent default wishlist. Custom named lists are reserved for logged-in customers when frontend list creation is enabled.
c. Can customers save the same product more than once?
Duplicate product and variation combinations are protected within a list. Clicking an already saved wishlist button removes that item instead of creating another row.
d. Does the wishlist support FluentCart variations?
Yes. It stores the selected variation and can display its label, price, and image, with the main product image as a fallback.
e. Can I place the wishlist button manually?
Yes. Bricks Builder users can use the Wishlist for Loop and Wishlist for Single Product elements. Standard FluentCart layouts receive automatic button placement.
f. How do I link visitors to their wishlist?
Use the automatically created Wishlist page, add [fluentcart_wishlist] to a custom page, or place the Bricks Wishlist Counter element in the site header.
Final Thoughts
A useful wishlist should do more than display a heart icon. It should preserve guest intent, remember customer selections, understand product variations, and stay synchronized wherever the same product appears.
FluentCart Wishlist handles those details while giving store owners both automatic placement and dedicated Bricks Builder elements. Once the plugin is configured, shoppers can save products from cards or single-product pages and return to them through a complete wishlist page or customer portal.


